


Two buttons, one garage door, and a pairing process that is not always as simple as it looks. This guide explains how to program a garage door opener to your car, choose the correct procedure for your system, and troubleshoot common compatibility and connection problems.
How to Program a Garage Door Opener to Your Car in Six Steps
- Park outside the garage and clear the doorway.
- Hold a working garage door remote one to three inches from the HomeLink buttons.
- Press and hold the selected HomeLink button and the handheld remote button. Release both when the HomeLink indicator changes from a slow flash to a solid light or rapid flashing. On some vehicles, the indicator also changes from orange to green.
- Press and hold the trained HomeLink button long enough to observe the indicator:
- Solid indicator: If the garage door operates, release the button. Programming is complete. If the door does not operate, continue to the troubleshooting section.
- Rapid flashing for approximately two seconds followed by a solid light: Release the button and continue to Step 5. This pattern indicates that HomeLink learned a rolling-code signal but has not yet been authorized by the opener.
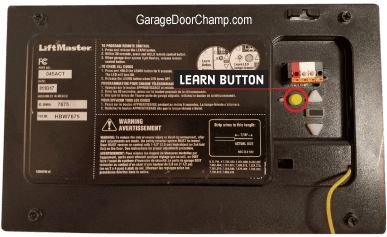
- Locate the Learn, Smart, or Program button on the garage door opener and activate programming mode by pressing and releasing the button once. A nearby indicator will usually turn on or begin flashing when programming mode is active.
- Within 20 seconds, return to the vehicle and press and release the trained HomeLink button. Repeat up to three times, stopping when the garage door responds.
Before you begin: Do not hold down the opener’s Learn button as holding it can erase the remotes, keypads, and vehicle controls connected to the system.
Security+ 3.0 exception: Security+ 3.0 openers with a white Learn button or white antenna use the original handheld remote for encrypted HomeLink programming rather than direct pairing at the motor unit. Steps 5 and 6 do not apply to these openers.
Know Your Car and Garage Door Opener
The programming sequence often depends on the control system in the vehicle and the technology used by the garage door opener.
In the vehicle, check:
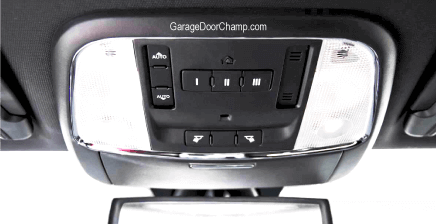
- Whether the built-in controls are HomeLink, Car2U, or another system
- Where the buttons are located, such as the rearview mirror, sun visor, overhead console, or center display
- Whether the vehicle uses physical buttons or touchscreen programming
- The vehicle’s make, model, and year
On the garage door opener, record:
- The opener manufacturer and model number
- The location and color of the Learn, Smart, or Program button
- The color of the antenna wire, when visible
- Whether the opener has an external receiver
The instructions below cover most HomeLink-equipped vehicles. If the vehicle uses Car2U or another built-in system, use the procedure for that system. If HomeLink is controlled through the vehicle’s touchscreen, follow the onscreen sequence as it may differ from the instructions below.
Should You Clear the HomeLink Memory First?
Clearing the HomeLink memory erases the programming for every garage door, gate, and other device stored in the vehicle. Whether this step is necessary depends on which button you want to use and whether it was previously programmed.
You usually do not need to clear the memory when:
- You are programming an unused HomeLink button.
- The vehicle allows a previously programmed button to be overwritten.
You may need to clear the entire system when:
- The button you want to use was previously programmed and the vehicle does not allow that button to be overwritten.
- You bought a used vehicle and do not know which devices are stored.
- You want to remove every programmed device and start over.
Clear the HomeLink memory before selling, returning, or transferring the vehicle.
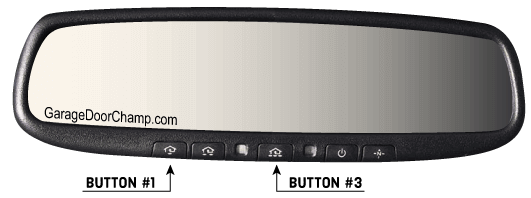
HomeLink does not normally let you erase one button at a time. However, some systems allow a programmed button to be overwritten without clearing the other buttons. Check the vehicle’s HomeLink instructions before clearing its memory. If you clear the memory, be prepared to reprogram every device you want to keep.
To clear the complete HomeLink memory on most systems, press and hold the two outer buttons for approximately 10 to 20 seconds, until the indicator changes to rapid flashing, then release them.
What to Know Before Programming
Do you need a handheld remote to program the garage door opener to your car? The standard HomeLink procedure uses a working handheld remote. If the remote is unavailable, a compatible wireless keypad can also be used.
Should the engine be running? The requirement varies by vehicle. Some vehicles require accessory mode, some require the ignition to be turned on, and others allow HomeLink programming with the vehicle off. Keep the engine off unless the vehicle’s instructions require it to run.
Where should the vehicle be parked? Park just outside the garage, approximately 5 to 10 feet from the door. This is a practical starting distance, not a fixed requirement. The vehicle should remain within the opener’s operating range and close enough to complete the timed Learn-button step.
Should the garage door be open or closed? Begin with the garage door closed, but expect it to move during programming. Keep people, pets, vehicles, and objects away from the doorway.
Does the remote battery need to be replaced? Not automatically. Confirm that the remote operates the garage door. Replace the battery if its range is limited or operation is intermittent.
Where is the opener’s programming button? The Learn, Smart, or Program button is usually on the motor unit, often near the antenna wire or beneath a light cover. Locate it before starting the timed rolling-code step, but do not press it yet.
Will you need a ladder or another person? Use a stable stepladder if the programming button is out of reach. A second person is not required, but can make the timed rolling-code step easier.
Troubleshooting HomeLink Programming Problems
Find the problem below that matches what the vehicle or opener is doing, then follow the checks in order.
The Car Does Not Learn the Handheld Remote
The vehicle has not learned the remote’s signal if the HomeLink indicator continues flashing slowly and never changes to a solid light or rapid flashing. Do not continue until HomeLink accepts the signal from the handheld remote.
Try the following in order:
- Confirm that the handheld remote still operates the garage door. If it does not work properly, replace the battery before trying to program HomeLink.
- Begin with the remote one to three inches from the HomeLink buttons. If the indicator remains slowly flashing, change the remote’s distance and angle. Try four to six inches away, then six to eight inches.
- Instead of holding the remote button continuously, hold the selected HomeLink button while pressing and releasing the remote button every two seconds. Continue until the HomeLink indicator changes.
- If available, try another working remote with a fresh battery. This can rule out a weak or inconsistent signal from the first remote.
- Before repeating the process, confirm that the vehicle is in the required accessory or ignition mode.
If HomeLink still does not learn the remote, check the vehicle’s HomeLink compatibility and programming procedure. The problem may involve the vehicle’s HomeLink system or an unsupported combination.
The Car Learns the Remote but the Opener Does Not Respond
Rapid flashing followed by a solid HomeLink indicator means the vehicle learned the handheld remote’s signal. If the garage door opener does not respond, the programming is incomplete or the two systems may require a different procedure.
Try the following:
- Confirm that the original handheld remote still operates the garage door. If no wireless control works, check whether the wall control’s Lock or Vacation mode is active before repeating the HomeLink steps.
- Move the vehicle closer to the garage. Park just outside the garage before repeating the programming process.
- Rule out frequency interference. Nearby electronics and some LED bulbs can interfere with the signal between HomeLink and the garage door opener. If the problem began after installing a new LED bulb in or near the opener, remove it temporarily and try again.
- Make sure you are using the correct programming button. If the opener uses a separate external receiver, activate programming mode at the receiver rather than the motor unit.
- Press and release the Learn, Smart, or Program button once. Confirm that the nearby programming indicator turns on or begins flashing. Do not hold the button down, as this can erase existing controls on many openers.
- Program the vehicle before time runs out. After pressing the Learn button, return to the vehicle quickly and press and release the HomeLink button up to three times. If the opener’s programming mode times out, it will not receive the signal from the car.
- Check for a white Learn button or white antenna. Use the Security+ 3.0 procedure explained above instead of Learn-button pairing.
If the garage door opener repeatedly rejects HomeLink, the problem is more likely to involve compatibility or an incorrect programming sequence than a defective opener.
When a HomeLink Repeater May Be Required
A repeater bridges a compatibility gap between an older HomeLink system in the vehicle and certain Security+ 2.0 garage door openers with a yellow Learn button or yellow antenna wire. It does not improve a weak signal or repair a defective remote, receiver, or logic board.
A HomeLink Compatibility Bridge may be needed when:
- The opener is a LiftMaster, Chamberlain, Craftsman, or Raynor model with a yellow Learn button or yellow antenna wire.
- The vehicle uses an older generation of HomeLink.
- HomeLink learns the handheld remote, but the opener will not accept the vehicle during the rolling-code programming step.
Yellow Learn-button and yellow antenna-wire openers from LiftMaster, Chamberlain, Craftsman, and Raynor were manufactured from 2011 through early 2026.
Based on field experience, vehicles manufactured before 2013 are more likely to require a HomeLink Compatibility Bridge. Nonetheless, HomeLink generations vary among manufacturers and trim levels. Check the vehicle and opener using HomeLink’s compatibility information before purchasing a repeater.
The kit includes a repeater and a remote used during setup. Keep the included remote after programming because it may be needed again when adding another vehicle or replacing the opener.
The Vehicle Works Only at Close Range
If HomeLink operates the garage door only when the vehicle is very close, compare its range with the handheld remote from the same location. This helps separate a HomeLink problem from an opener reception problem.
- Both HomeLink and the handheld remote have limited range: Check for frequency interference, an obstructed antenna wire, or a problem with the opener’s receiver.
- The handheld remote works from a normal distance but HomeLink does not: A component or electronic device inside the vehicle may be blocking or interfering with the signal, or the vehicle’s HomeLink transmitter may be defective.
- The opener’s antenna wire is curled, blocked, or tucked inside the housing: Let it hang straight and unobstructed. Do not cut, splice, or extend it.
- The opener uses an external receiver: Check that its antenna is exposed and that the receiver is not blocked by metal or other equipment.
Remotes and Keypads Stopped Working
If the remotes and wireless keypads stopped working during or after HomeLink programming, the opener’s Learn button may have been held too long, erasing the memory with all wireless controls stored in the opener. Reprogram each remote and keypad to the opener. Then repeat the pairing step to reconnect HomeLink.
When to Have the System Checked
If a working handheld remote operates normally but HomeLink still cannot be programmed, the vehicle’s HomeLink system should be checked. If every wireless control fails or has poor range, the opener’s receiver or logic board may require professional testing.
Questions? We Have Answers
How many garage doors can one HomeLink system control?
A three-button HomeLink system can normally control up to three garage doors, gates, or other compatible devices. Program each device to a separate button.
Can multiple vehicles operate the same garage door?
Yes. Program each vehicle separately. Each garage door opener has a limit on the number of remotes, keypads, and vehicle controls it can store. The limit varies by model.
Is the handheld remote needed after HomeLink is programmed?
No. Once programming is complete, HomeLink can operate the garage door without the handheld remote.
Does HomeLink require Wi-Fi, an app, or a subscription?
No. Standard HomeLink communicates directly with the garage door opener by radio signal.
Will HomeLink need to be reprogrammed after replacing the garage door opener?
Yes. The replacement opener uses different programming, so the HomeLink button must be trained and paired with the new opener.
Why does HomeLink open the garage door but not close it?
Test the handheld remote and wall control. If they also cannot close the door, check for an obstruction or a problem with the safety sensors. If only HomeLink fails, the HomeLink connection or vehicle transmitter should be checked.


