


When a garage door opener struggles, it usually has something to say. It may click, hum, grind, or lift the door a few inches before stopping. Those sounds and movements are not random. They are clues, and the flashing arrows on the control panel can provide another.
This guide covers LiftMaster, Chamberlain and Craftsman Security+ 2.0 openers manufactured from 2011 through 2025 with a yellow Learn button and up-and-down diagnostic arrows. The Learn-button color provides more reliable confirmation than the manufacturing year. Older openers with green, red, orange, or purple Learn buttons and Security+ 3.0 models released in early 2026 with a white Learn button use different systems and are not covered here.
Count the flashes to identify the code and narrow down what may be causing the opener problem. The code reports what the opener detected, not necessarily which part failed.
Whether ceiling-mounted or wall-mounted, the opener operates as part of the complete garage door system. A problem with the door or its hardware can therefore trigger an opener error code. Treat the code as a starting point, and check the door before blaming the opener.
Read the Code Before It Disappears
Check for an error code as soon as the opener fails. Waiting or operating the door again may cause the flashing sequence to stop displaying.
Find the yellow Learn button on the opener’s control panel. Depending on the model, the control panel may be on the back or side of the motor unit or behind a light cover. Look near the antenna wire for the yellow Learn button and the up-and-down arrow buttons beside it.
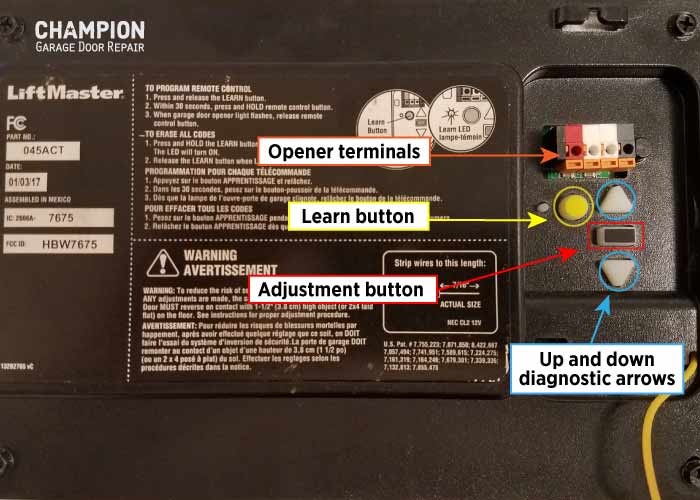
When the arrows begin flashing, count the sequence in this order:
- Count the up-arrow flashes.
- Next, count the down-arrow flashes.
- After the pause, watch the sequence repeat to confirm both numbers.
For example, one up-arrow flash followed by five down-arrow flashes is error code 1-5. Write down the code and what the door was doing when it appeared, such as closing and reversing, moving only a few inches, clicking, humming, or not responding. Take a short video of the flashing sequence if the pattern is difficult to count.
Before Following the Code, Look at the Door
The error code can wait a moment; an unstable door cannot. Before testing the opener or attempting to operate the garage door manually, check the door’s position and look for visible damage or anything out of position from a safe distance.
Stop operating the door and call for service if:
- A spring has a visible gap.
- The door dropped suddenly or made a loud bang.
- The door hangs crooked or a roller is off the track.
- A track is visibly bent, misaligned, or displaced.
- A cable is loose, frayed, or displaced.
- The door binds, jerks, or repeatedly stops at the same point.
- The opener smokes, smells burned, or shows signs of overheating.
Do not pull the emergency-release handle while the door is open, crooked, or unstable. Disconnecting the opener in these conditions can allow the door to fall or slam shut. Keep people, pets, and vehicles clear.
If the door is fully closed, level, and shows no visible damage, you can proceed with the safe checks listed under the applicable error code.
Rule Out the Simple Problems First
If the door appears stable, check for a basic problem before interpreting the code:
- Make sure the opener is plugged in and check the circuit breaker or GFCI outlet.
- Check for objects blocking the doorway and tracks.
- Check whether the manual door lock is engaged.
- Look for dirt or an obstruction between the safety sensors.
- Test the hardwired wall control, remote, and keypad separately.
The results can help narrow the problem. If the wall control works but the remote does not, the remote battery, programming, vacation mode, or receiver may be involved. If none of the controls work, start by checking the opener’s power supply. If the door begins closing and reverses, inspect the doorway and safety sensors before assuming the motor has failed.
Before touching exposed wiring or terminal connections, unplug the opener and disconnect the backup battery if applicable. Do not remove the motor cover or attempt to test or modify internal electronics.
Quick Guide to Yellow Learn Button Error Codes
Find the flash sequence shown by your opener for a brief explanation and the first safe step to take. Continue to the corresponding section below for the complete troubleshooting process.
| Error code | What the opener detected | First safe step |
| 1-1 | The opener cannot detect the safety sensors | Check the sensor lights, visible wires, and terminal connections |
| 1-2 | The safety-sensor wires are reversed or shorted | Look for crossed connections, touching wire strands, or damaged insulation |
| 1-3 | The wall-control wires are shorted | Inspect the wall-control wire and terminals for damage or loose strands |
| 1-4 | The safety-sensor beam was briefly blocked or misaligned | Clear the doorway, clean the lenses, and check the sensor alignment |
| 1-5 | The expected motor movement was not detected | Check for an obstruction and observe whether the door is heavy, crooked, or binding |
| 1-6 | Movement continued after the motor stopped | Check whether the door drifts, drops, or rises after stopping |
| 2-1 through 2-5 | An internal logic-board component failed | Record the complete code and power-cycle the opener |
| 3-2 | The opener could not set or retain its travel position | Power-cycle the opener, then follow the applicable travel-programming procedure if the code returns |
| 3-3 | The opener detected excessive voltage in the battery-backup circuit | Confirm the model number and check the battery connections. Do not handle a hot, swollen, or leaking battery |
| 3-5 | A wall-mounted opener cannot detect its cable-tension monitor | Check that the monitor is mounted, connected, and visibly undamaged |
| 4-1 | Excessive force was detected while closing | Check for an obstruction, binding door, or damaged hardware |
| 4-2 | Excessive force was detected while opening | Check whether the door is heavy, binding, or has a broken spring |
| 4-3 | Motor RPM was lost while closing | Stop operating the opener and check for resistance or visible door damage |
| 4-4 | Motor RPM was lost while opening | Stop operating the opener and check for resistance or visible door damage |
| 4-5 | The opener did not recognize the travel module | Follow the power-cycle and model-specific travel-programming steps under Error Code 3-2 |
| 4-6 | A sensor problem was detected when the opener received a close command | Clear the doorway and check the sensor lights, alignment, and visible wiring |
| 5-5 | A required myQ Smart LED Light was not detected | Confirm that the light has power, is compatible, and is programmed |
Error Code 1-1 — The Opener Cannot Detect the Safety Sensors
One up-arrow flash followed by one down-arrow flash means the garage door opener cannot detect the safety sensors. The door may open normally but will not close with the remote or keypad because the opener is not receiving the required signal from the sensor system.
Check the indicator light on each sensor. If one or both lights are off, look for a loose connection at the sensor, visible damage to the low-voltage wire, or a wire that has been pinched, cut, or pierced by a staple. Also check the wire terminals on the opener.
Do not bypass the sensors or begin replacing parts based on the code, as Code 1-1 does not prove that the sensors have failed. The problem may involve a disconnected sensor, damaged wire, loose terminal, or the circuit supplying power to the sensors. If the wiring disappears behind finished walls or the visible checks do not reveal the problem, the sensor circuit should be tested professionally.
Error Code 1-2 — The Safety-Sensor Wires Are Reversed or Shorted
One up-arrow flash followed by two down-arrow flashes indicates reversed wiring or a short in the safety-sensor circuit. The door may open but refuse to close because the opener cannot receive a proper signal from the sensors.
Look for bare wire strands touching each other, reversed wires at the opener terminals, or wire that has been pinched, cut, or pierced by a staple. If the home was prewired for garage door sensors, the short or reversed connection may be hidden at a splice or behind the wall.
If the visible wiring and terminal connections appear correct, the circuit should be tested to locate the short and determine whether the problem is in the wiring, a sensor, or the opener’s control board.
Error Code 1-3 — The Wall-Control Wires Are Shorted
One up-arrow flash followed by three down-arrow flashes means the opener detected a short in the wall-control wiring lasting more than four seconds. The hardwired wall control may stop responding even though the remote or keypad still operates the door.
Inspect the low-voltage wire running from the wall control to the opener. Look for bare strands touching at either terminal, loose connections, crushed insulation, or wire pierced by a staple. If the code appeared after painting, remodeling, or replacing the wall control, check whether a wire was pinched or connected incorrectly.
Error Code 1-3 points to the wall-control circuit but does not necessarily mean that the wall control itself has failed. Therefore, the wiring, wall control, and control-board connection should be tested before any component is replaced.
Error Code 1-4 — The Safety Sensors Were Briefly Blocked or Misaligned
One up-arrow flash followed by four down-arrow flashes means the safety sensors were obstructed or misaligned for less than four seconds. The door may begin closing and then reverse, even if there’s nothing in the doorway now.
Remove anything near the sensor beam and wipe both lenses with a clean, dry cloth. Make sure the sensors face each other and their indicator lights remain steady. Also check for a loose sensor bracket, vibration, direct sunlight, or an object that may have crossed the beam while the door was closing.
Code 1-4 does not always indicate a failed sensor. If the problem is intermittent and returns without an obvious obstruction, check the sensor alignment, brackets, wiring, and connection points for movement, damage, or loose connections.
Error Code 1-5 — The Opener Did Not Detect Motor Movement
One up-arrow flash followed by five down-arrow flashes means the opener did not detect the expected motor movement. The door may move a few inches and stop, or the opener may click or hum without moving it.
Possible causes range from a heavy, obstructed, or binding door to a problem with the trolley, travel module, motor, wiring, or control board. Error Code 1-5 indicates that the expected movement did not occur, not which component caused the problem.
Start with the safety checks above, then use our complete guide to Garage Door Opener Error Code 1-5 to compare the opener’s behavior with the appropriate next steps.
Error Code 1-6 — Movement Was Detected After the Motor Stopped
One up-arrow flash followed by six down-arrow flashes means the opener detected movement after the motor stopped. The door may coast beyond its programmed open or closed position instead of stopping where expected.
The travel limits may need to be reprogrammed, but the garage door should be checked first. An unbalanced door or a spring problem can cause the door to continue moving under its own weight after the opener stops.
Do not reset the travel limits to compensate for a door that drifts, drops, or rises on its own. If the door is fully closed and shows no visible damage, it may be disconnected for a balance check. Do not use the emergency release while the door is open or unstable.
Error Codes 2-1 Through 2-5 — The Logic Board Detected an Internal Failure
Two up-arrow flashes followed by one to five down-arrow flashes indicate an internal logic-board component failure. The opener may not respond or make any sound when the wall control, remote, or keypad is used.
Record the complete code before resetting the opener. Then unplug the unit and disconnect the backup battery if applicable to complete a power cycle. Restore power and test the opener.
If the same code returns, resetting or reprogramming the opener is unlikely to resolve the problem. The logic board and its connections should be tested before deciding whether to replace the board or the complete opener.
Error Code 3-2 — The Opener Could Not Set or Retain Its Travel Position
Three up-arrow flashes followed by two down-arrow flashes mean the opener could not set or retain the door’s travel position. The code may appear after a power interruption, unsuccessful travel programming, or a problem involving the travel module, its connections, or the control board.
Record the code and power-cycle the opener. If Code 3-2 reappears, locate the model number and use the procedure below. Security+ 2.0 and MC openers use the same first five steps to set the garage door open and closed positions, but they complete the force setup differently.
Keep people, pets, vehicles, and objects out of the doorway during programming. The safety sensors are temporarily disabled while the travel positions are being set.
Set the Open and Closed Positions
- Press and hold the rectangular Adjustment button between the arrow buttons until the up arrow begins flashing. On some models, the opener will also beep.
- Press and hold the up arrow until the door reaches the desired open position.
- Press and release the Adjustment button to save the open position. The opener lights will flash twice, and the down arrow will begin flashing.
- Press and hold the down arrow until the door reaches the desired closed position.
- Press and release the Adjustment button to save the closed position. The opener lights will flash twice.
Complete the force setup that applies to your opener.
Security+ 2.0 and myQ-Enabled Openers
- When the up arrow begins flashing, press and release it. Allow the door to complete a full opening cycle to set the opening force.
- When the down arrow begins flashing, press and release it. Allow the door to complete a full closing cycle to set the closing force.
MC Garage Door Openers
After the closed position is saved, the safety sensors reconnect and the opener begins the force setup automatically. The opener provides an audible and visual warning, then opens and closes the door by itself. Three beeps confirm that the force setup was completed successfully. If the opener produces one long beep after attempting to move, restart the travel-programming process.
Test the Safety-Reversal System
After programming, open the door fully and place a 2-by-4 flat on the floor beneath its center. Close the door using the remote or wall control. The door must reverse when it touches the board.
If the door stops without reversing, repeat the travel-programming process and test it again. If the door still does not reverse, stop using the opener and have the safety-reversal system serviced.
If Code 3-2 reappears after power cycling and the correct travel-programming procedure, the problem may involve the power supply, travel module, wiring connections, or control board.
Error Code 3-3 — The Logic Board Detected Excessive Battery Voltage
Three up-arrow flashes followed by three down-arrow flashes mean the opener detected excessive voltage in the battery-backup circuit. The battery indicator light may flash green continuously.
Code 3-3 points to a logic-board failure involving the battery-backup circuit, not an ordinary low or depleted battery. Record the model number and confirm that the specified battery is installed and properly connected.
If the battery and connections are correct, the logic board should be tested. Do not continue using the battery-backup system if the battery becomes hot, swells, leaks, or produces an unusual odor.
Error Code 3-5 — The Cable-Tension Monitor Was Not Detected
Three up-arrow flashes followed by five down-arrow flashes mean a wall-mounted opener is not receiving a signal from its cable-tension monitor. The door may begin closing and reverse or remain in the open position.
Check whether the monitor is securely mounted and whether its wire is connected and visibly undamaged. Do not attempt to reposition a loose cable or operate a door with displaced or damaged cables.
Code 3-5 may involve the cable-tension monitor, its wiring or connection, cable tension, or the opener’s control board. If the visible parts appear intact, the monitor circuit and door cables should be tested by a professional garage door repair company.
Error Codes 4-1 Through 4-4 — Force or RPM Changed During Travel
Four up-arrow flashes followed by one to four down-arrow flashes mean the opener detected abnormal resistance or lost motor RPM while moving the door:
- Code 4-1: Excessive force while closing
- Code 4-2: Excessive force while opening
- Code 4-3: RPM was lost while closing
- Code 4-4: RPM was lost while opening
The door may stop before completing its travel, reverse while closing, or move only partway. Possible causes include an obstruction, broken spring, unbalanced door, binding roller or hinge, bent or misaligned track, damaged door section, incorrect travel settings, or a problem with the travel module, motor, or control board. On applicable wall-mounted models, an incorrect door profile may also contribute to the problem.
Do not increase the opener’s force to push the door through resistance. Start with the safety checks above, then use our complete guide to garage door opener excessive-force errors to identify the appropriate next step. If the door is heavy, crooked, binding, or visibly damaged, stop operating it and call for service.
Error Code 4-5 — The Opener Did Not Recognize the Travel Module
Four up-arrow flashes followed by five down-arrow flashes mean the opener does not recognize the travel module that monitors the door’s movement and position. The opener may run for approximately six to eight inches, stop, or reverse to the open position.
The problem may involve a defective travel module, a loose or damaged wire harness, a connection problem, or the control board. The code may also appear if the opener cannot complete or retain its travel programming.
After recording the code, power-cycle the opener and follow the model-specific travel programming procedure identified under Error Code 3-2. If the limits cannot be programmed or Code 4-5 reappears, the travel module, wire harness, connections, and control board should be tested.
Error Code 4-6 — An Active Safety-Sensor Problem Prevented Closing
Four up-arrow flashes followed by six down-arrow flashes mean the opener received a command to close while the safety sensors were obstructed, misaligned, disconnected, or not communicating properly. The door may begin closing and reverse, or it may remain open while the opener lights flash or the unit clicks.
Unlike Code 1-4, which records a brief sensor interruption, Code 4-6 appears when the opener receives a close command after detecting a sensor problem. Remove objects from the doorway, clean the lenses, and check that both sensors face each other with steady indicator lights.
If the sensor lights are off or flickering, inspect their alignment, wiring, and connections for looseness or damage. If both sensors face each other and the visible wiring is intact, the sensors, wiring circuit, and control-board connections should be tested by a professional.
Error Code 5-5 — The myQ Smart LED Light Was Not Detected
Five up-arrow flashes followed by five down-arrow flashes mean the opener received an unattended command from myQ but did not detect a programmed myQ Smart LED Light. The door will remain in its current position.
This code applies only to models that require a separate myQ Smart LED Light for unattended operation. Confirm that the light is plugged in and compatible with the opener, then program it as follows:
- Press the Learn button on the Smart LED Light until its green indicator turns on.
- Press and release the Learn button on the garage door opener.
- Wait for the Smart LED Light to blink once, confirming that it has been programmed.
If the light does not blink or Code 5-5 reappears, confirm that the light is compatible with the opener. If it is compatible, the light, wireless connection, and control board should be evaluated.
What the Opener’s Sounds Add to the Error Code
An error code records what the opener detected, while the sound can help narrow down when the movement failed.
- A single click: The opener received the command but could not begin the next operation. The door, travel system, motor, or control board may be involved.
- A short hum without movement: The opener is receiving power, but the motor cannot run. The door may be binding, the trolley may be stuck against the stop bolt, or an internal opener component may be malfunctioning.
- The motor runs but the door does not move: The trolley may be disconnected, or the belt, chain, gear, or sprocket may be damaged. Observe whether the chain or belt moves to help narrow the possibilities.
- No sound after completing the power and control checks: The opener’s internal power supply, motor, or control board may require testing.
Do Not Replace the Opener Based on an Error Code
An error code does not prove that the entire opener needs replacement. Garage door opener repair may be practical when testing confirms a single failed component and a compatible replacement part is available.
The opener’s age and overall condition should also be considered, especially when an older unit requires an expensive motor, travel module, or control-board repair.
If the opener has recurring internal faults, several major components have failed, or the required parts are no longer available, compare the repair cost and warranty with those of a new garage door opener.
The door must also operate correctly. A new opener will not resolve problems caused by a broken spring, damaged track, binding door, or improper balance.


