If your garage door starts closing but then pops back up, or if it suddenly won’t close, the issue is likely with your garage door sensors.
This guide will help you troubleshoot and resolve the issue to get your garage door working again. We’ll begin with basic solutions and gradually move on to more advanced troubleshooting and repairs.
Table of Contents
- Remove Obstructions
- Clean the Sensors
- Alignment and Adjustment
- Fix Issues with Short or Broken Wire
- Fix Issues with Direct Sunlight
- Testing Garage Door Sensors Directly via the Opener
- Check for Dimmed Sensor LED Lights
- Verifying That Your Sensors Are the Issue
- Sensor Error Code Information
- Replacement of the Sensors
- What to Do Until Your Sensors Are Fixed
1. Remove Obstructions
The safety sensors have an infrared beam that prevents your garage door from closing if obstructed. Start by ensuring there are no objects blocking the sensor’s path. This could be a piece of cloth, a garden tool, a child’s toy, or anything else that might interfere with the sensor’s beam.
2. Clean the Sensors
Wipe each sensor lens with a dry washcloth. Make sure the surrounding area is clean by removing any debris that could interfere with the sensors.
3. Alignment and Adjustment
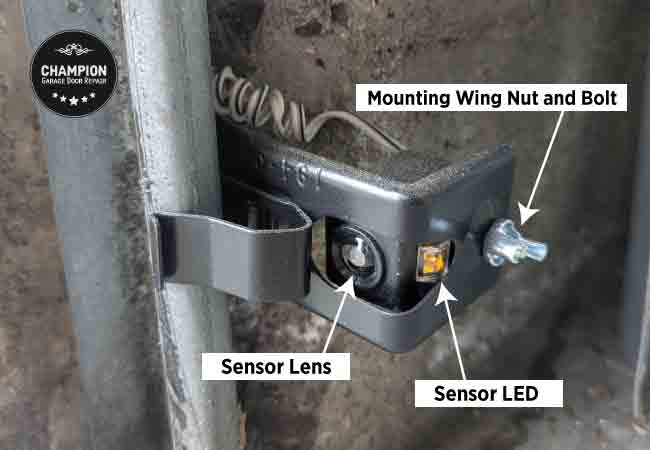
Misaligned safety sensors are often indicated by a flashing LED light on the receiver sensor. You can realign the sensors by adjusting their brackets until the receiver sensor’s LED stops flashing and stays solid.
The sensors should face each other and be positioned at approximately the same height. There’s no need for complex measuring techniques; just ensure they are aligned properly. Align your sensors by following these instructions.
In some cases, you may need to loosen the wingnut that secures the sensor to its bracket. Adjust the sensor to the correct position, then retighten the wingnut. Otherwise, gently push or pull the sensor’s bracket into the desired position.
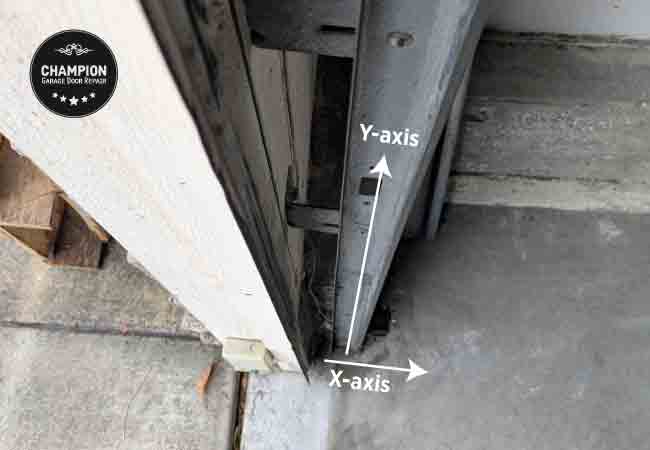
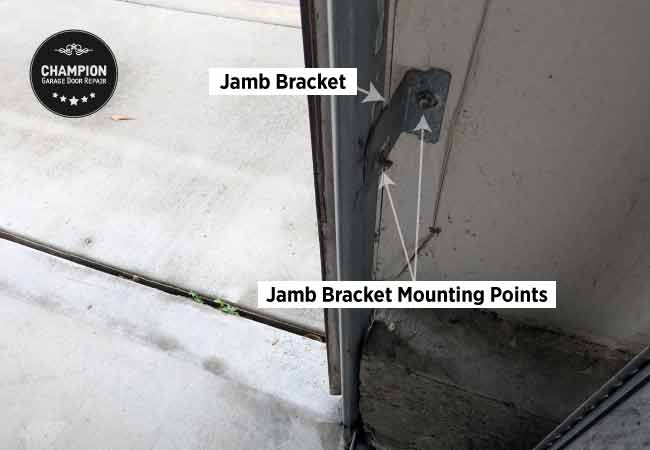
If the garage door track to which the sensor is attached is misaligned, you may need to adjust the track by pushing or pulling it into the correct position. Ensure that the jamb bracket’s screws are securely fastened to both the wall and the track. The track should be relatively straight along both the X and Y axes.
4. Fix Issues with Short or Broken Wire
Your garage door safety sensors will not function properly if the wires connecting them to the electric opener are shorted or broken. The receiving sensor’s LED may continue flashing even when the sensors are aligned, or the sensors may lose power altogether, which will cause their LED lights to stay off.
Inspect the wiring and connections for any breaks, kinks, damage, pinched sections, or loose wires. In some cases, staples securing the wire may be driven in too deeply, causing a short circuit. Remove any problematic staples, retighten the connections, or replace the wires if necessary.
What type of wire should you use for your garage door sensors? Use a two-conductor, low-voltage wire. Anything between 20 and 24 gauge should work. Secure the wires to the wall using a staple gun or wire clips.
If you’re not sure whether the wires are defective, proceed to “6. Testing Garage Door Sensors Directly via the Opener.”
5. Fix Issues with Direct Sunlight
If your garage door won’t close or starts closing and then opens back up when sunlight is shining on the safety sensors, the sun’s UV rays may be the cause.
UV rays from the sun can damage plastic components, such as your garage door safety sensor’s lens. Just like with car headlights, UV rays can break down the sensor lens cover, causing yellowing, cloudiness, and other effects overtime. If your garage door sensor lens becomes too cloudy or damaged, it may interfere with the infrared beam and prevent the door from closing properly.
To address issues caused by direct sunlight interfering with your garage door sensors, you can try swapping the left and right sensors to see if it improves performance. You can also shield the sensors from sunlight using a piece of cardboard or sheet metal. If these solutions don’t work, replace the sensors altogether.
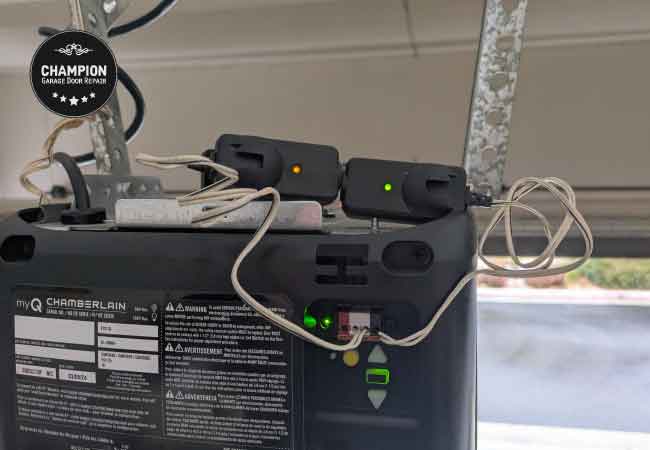
6. Testing Garage Door Sensors Directly via the Opener
If you’re not sure what’s causing the problem with your sensors, you can test them by connecting them directly to the garage door opener and aligning them while they are close to each other. This method will help you troubleshoot and determine whether the issue lies with the wires, the sensors or something else. Begin by following the steps below:
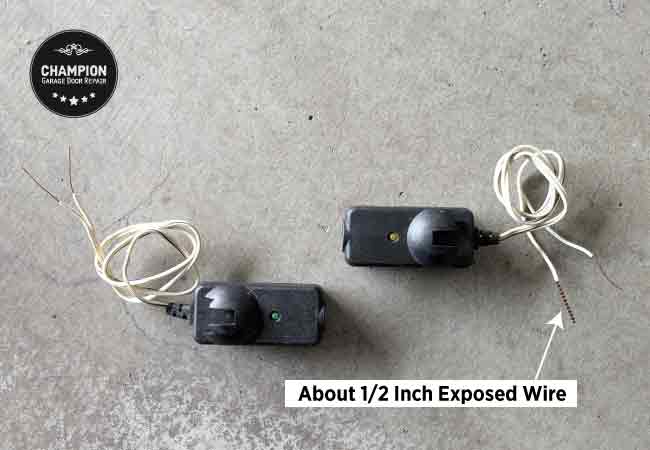
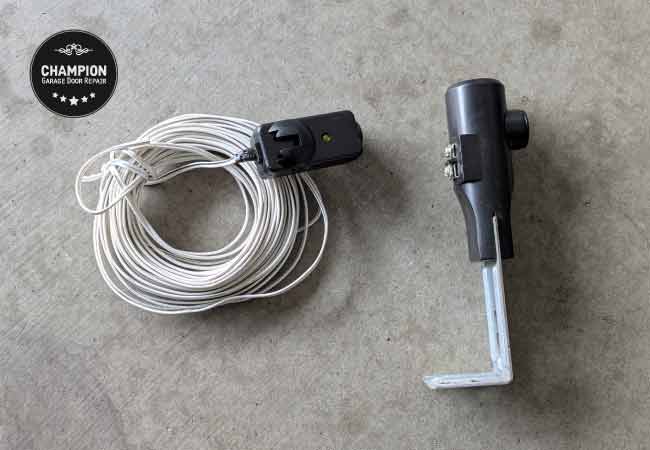
- If the sensors have permanently attached wires, cut both sensor wires, leaving about 12 inches of spare wire, and remove the sensors from their position.
- If your sensors have terminals, loosen the terminal screws to disconnect the wires, then remove the sensors from their position. You’ll need a short two-conductor, low-voltage wire. Wires between 20 and 24 gauge should work.
- Strip the wires ends, leaving about ½ an inch of exposed wire.
- Connect both sensors directly to the opener’s designated terminals.
Wiring Guide for Common Garage Door Openers:
- LiftMaster or Chamberlain: Connect the black wires to the black terminal and the white wires to the white terminal.
- Genie: Connect the black wires to the orange terminal and the white wires to the brown terminal.
- Other openers (old Genie, Marantec, Linear): The sensor terminals may be labeled with numbers (1 and 2), letters (STB), or simply “Photo Eye.” Refer to your garage door opener’s owner manual for specific instructions.
Align the sensors once they are properly connected to the motor head to determine the source of the issue:
- If both sensor LED lights turn on and remain solid, the issue is likely with the wiring, and the wires need to be replaced. Test your garage door to ensure it closes properly.
- If your garage door won’t close even when both sensors are aligned, positioned close to each other, and their LED lights are on, the sensors may be defective. Replace them and retest your garage door.
- If the sensors’ LED lights do not turn on, the sensors themselves are defective and need to be replaced. In some cases, the issue may also be faulty terminals or a defective opener motherboard.
Make sure the exposed white and black wires do not touch, otherwise the sensors won’t work properly.
7. Check for Dimmed Sensor LED Lights
In some cases, the sensors’ LED lights may appear to be on and solid from a distance. Close your garage door and inspect each sensor’s LED up close. Use your hands to create a dark enclosure around the sensor and check if the LED light appears dim. A dim LED light usually indicates that the sensor is defective. Replace the sensors and test your garage door.
Verifying That Your Sensors Are the Issue
There are many potential issues that can prevent your garage door from closing, and it’s easy to mistakenly assume that the sensors are the cause. You can verify that your garage door sensor system is indeed defective by following the steps below:
- Press and hold the hard-wired wall button. This function allows you to override the safety sensors. If the door closes while holding the button, the issue is with the sensors.
- Manually inspect the sensors for any visible damage, loose wiring, or signs of wear that could affect their performance.
- Make sure the sensors are receiving power. Both sensor LEDs should be on and steady. If one is flashing or off, there is an issue with the photo-eye system.
- On older opener models, the opener’s light bulb may blink 10 times, followed by a clicking sound.
- Read the error code or check the indicator lights on your garage door opener, if available. Many modern openers have diagnostic systems that can help identify sensor-related issues. Refer to your garage door opener owner’s manual or the sensor error code information below for guidance.
Sensor Error Code Information
Reading the error code from your garage door opener can help you diagnose and resolve issues more efficiently. Below are the most common error codes related to sensor problems:
Error Codes for LiftMaster and Chamberlain
- Up arrow flashes once, down arrow flashes once: Safety sensors are not installed, not connected, or the wires may be cut.
- Up arrow flashes once, down arrow flashes twice: There is a short circuit or reversed wiring in the safety sensors.
- Up arrow flashes once, down arrow flashes four times: Safety sensors are misaligned or were momentarily obstructed.
Error Codes for Genie
- Round LED is on, red, and flashing while the long LED is off: Indicates an issue with the safety sensors. Possible causes include an obstruction, a shorted wire, or a connection issue.
Error Codes for Marantec
- Code 15: Indicates a problem with the safety sensors, such as disconnected, misaligned, or obstructed photo-eye sensors.
Replacement of the Sensors
If you’ve determined that your garage door sensors need replacement, start by identifying your opener brand. Most safety sensors are not interchangeable, so you’ll need to purchase sensors compatible with your garage door opener.
Some garage door opener brands, like Genie, use sensors with terminals that allow easy wire connection and removal. Brands like LiftMaster, Chamberlain, and Marantec have sensors with permanently attached wires.
Once you have the new sensors, follow these steps to replace them:
- At this point, you can choose to replace the wall wires, although you only need to replace them if they are damaged.
- Start by removing the old sensors. If the sensors have permanently attached wires, cut the wires near the sensor connection. If the sensors have terminals, loosen the terminal screws to disconnect the wires.
- Strip both the new sensors and the wall wires, leaving about ½ to 1 inch of exposed wire on each end. Connect the new sensors to the wall wires: white to white and black to black. If your wall wires are white and red, connect white to white and red to black.
- If you’re replacing the sensors and wall wires, use a two-conductor, low-voltage wire. Wires between 20 and 24 gauge should work. Secure the wires to the wall and ceiling using a staple gun or wire clips.
- If your new sensors have terminals, strip the wall wires, insert them into the sensor terminals, and tighten the terminal screws.
- Make sure the new sensors are properly wired. Position and securely fasten them in place.
Align the sensors with each other, ensuring both LEDs are lit and solid, then test your garage door. Once your garage door is working again, secure the wire connections with electrical tape, wire nuts, or splice connectors.
What to Do Until Your Sensors Are Fixed
Garage door openers are usually equipped with a constant override function, allowing you to bypass the safety reversing sensors. Simply press and hold the hardwired wall button until the door fully closes. The override function will not work when using handheld remote controls, keypads, or car-integrated openers.
Another option is to operate the door manually. You can disconnect your garage door from the opener by following these instructions.
Ask for Professional Help
The photo-eye sensors system is a mandatory garage door safety feature designed to prevent accidents, injuries, and property damage. For this reason, it is recommended to have the sensors inspected and repaired by a licensed garage door repair professional.


