There could be several reasons your garage door opener is showing an excessive force error, also known as error codes 4-1, 4-2, 4-3, or 4-4. Although this error can occur with standard ceiling-mounted garage door openers that have a travel module, it is more common with side-mounted openers due to sensitivity issues. Below are seven common causes of excessive force error and how to fix them:
1. Obstructions
Obstructions can create excess pressure on the garage door as it moves, prompting your opener to reverse or stop, which can lead to excessive force errors. Inspect the door alignment and frame, and check for any obstructions along the garage door tracks, such as loose bolts, bent tracks, or objects caught in the doorway. Realign the door and tighten any loose bolts as needed.
Additionally, failing or buckling door sections can prevent the door from closing properly and may result in error codes. Repair and reinforce failing sections with designated garage door struts, or replace worn sections as needed.
2. Opener Force and Limits
In some cases, simply recalibrating your garage door opener’s force settings and reprogramming the travel limit can resolve the excessive force error. Follow these steps to program the opener limit:
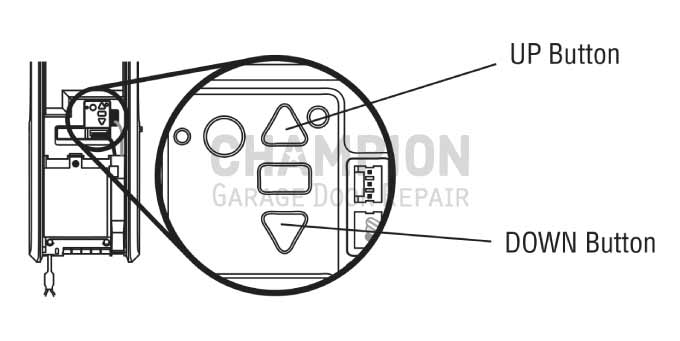
- On the motor’s control panel, press and hold the adjustment button (the black rectangle between the arrow buttons) until the up-arrow button flashes and/or a beep is heard.
- Press and hold the up-arrow button until the garage door reaches the desired open position. For standard garage doors, avoid moving the door too high past the top of the opening, as this can cause the door cable to come off the drum. If the door is raised too high, you can adjust its position by pressing the down-arrow button.
- Once the door is in the correct open position, press and release the adjustment button. The garage door opener lights will flash twice, and the down-arrow button will begin to flash.
- Press and hold the down-arrow button until the door reaches the desired closed position. Avoid setting the travel limit with the door pressed tightly against the garage floor; it’s preferable to leave about half an inch of space above the floor. If the door is too tight, press the up-arrow button to lift it slightly.
- Once the door is in the correct closed position, press and release the adjustment button. The garage door opener lights will flash twice, indicating that the programming process is complete. If the lights flash five times, the programming has timed out, and the travel limits have not been set. In this case, return to step 1 to restart the process.
- After completing the manual programming process and pressing the adjustment button, the garage door opener will automatically set up the force by opening and closing the door. The opener will sound an audible and visual alert before moving the door and will beep three times to confirm the automatic force setup has been completed successfully.
A long beep from the garage door opener indicates that the automatic force setup was not completed. In this case, go back to step 1 to restart the process. LiftMaster and Chamberlain openers with a travel module require you to program the limits to recalibrate the force.
Note that the safety sensors will not function during the travel limit programming process. If the opener limits cannot be programmed, replace the motor’s control board.
3. Outdated Garage Door Opener Software
Your garage door opener’s software might be outdated with out-of-date sensitivity settings. To update the opener software, you’ll need to connect it to your home Wi-Fi. Here’s what you’ll need:
- A Wi-Fi signal at the door opener location
- A Wi-Fi-enabled smartphone, tablet, or laptop
- Your Wi-Fi password
Follow these steps to connect:
- Press the opener’s yellow Learn button three times. The black rectangular button should beep and begin blinking blue.
- Go to your smart device’s Wi-Fi settings and find your garage door opener. Select it and enter your Wi-Fi password.
- Once the black rectangular button turns solid green, the opener is successfully connected to your Wi-Fi.
If you’ve already connected your garage door to the MyQ app, your opener is already receiving updates, so you don’t need to repeat these steps.
Since there is no way for you to check the current software version, contact LiftMaster/Chamberlain customer support at 1 (800) 528-5880 to ensure your software is up-to-date.
4. Incorrect Door Profile Selected
This applies to LiftMaster 98022, 98032, Chamberlain RJO101, and other wall-mounted RJO garage door openers that require selecting a door profile while programming the opener’s force and limits. Below are the available door profiles:
- Door Profile 1: Standard to heavy-weight door with a 4″ drum
- Door Profile 2: Lightweight door with a 4″ drum
- Door Profile 3: Heavy-weight door with a 6″ drum
- Door Profile 4: Lightweight door with a 6″ drum
- Door Profile 5: Tapered drum with rails that rise to a higher elevation or rails that rise vertically above the opening
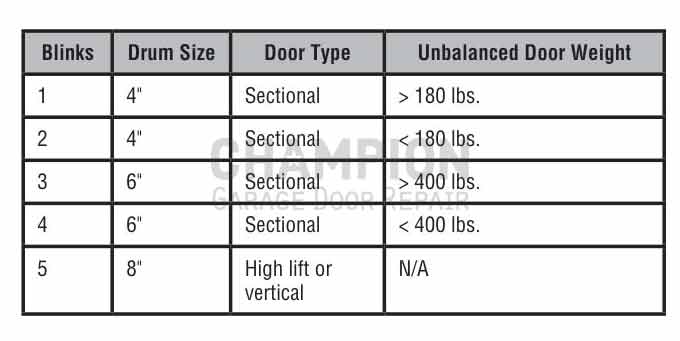
If your garage door opener still returns an excessive force error with the correct door profile selected, try toggling between profiles 1 and 5. Profile 5 often works better for recurring excessive force errors.
Follow the steps below to change your door profile:
- To select a door profile, press and hold the black rectangular button for one second, until the Up and Down buttons light up and stay solid.
- Press the Up and Down buttons to select the desired door profile. The Learn LED button will blink and beep as you scroll through the profiles.
- The number of Learn LED button blinks indicates the selected profile. For example, if the LED blinks three times, profile 3 is selected.
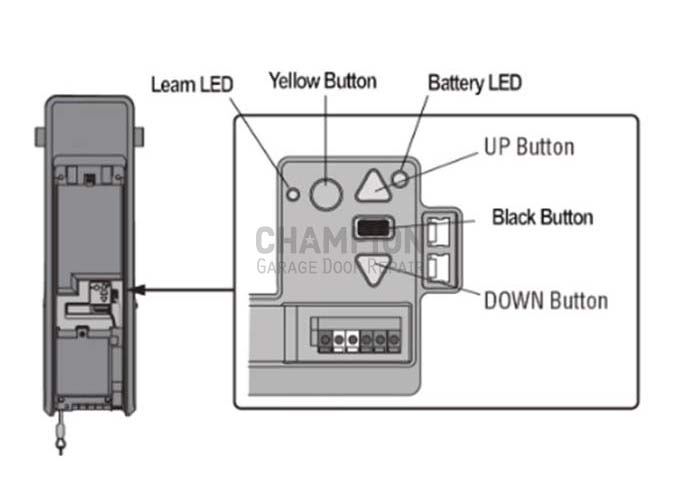
Press and release the black rectangular button to set the door profile and complete the process. Then, proceed to program the opener limits.
5. Garage Door Balance and Springs
An unbalanced garage door can lead to several issues, including excessive force errors. To check the balance, disconnect the door from the opener and switch it to manual mode. Lift the door halfway and then three-quarters of the way. If it remains in place without moving, it is properly balanced. If it does not, the door needs to be balanced and the springs may need to be recalibrated. While minor deviations from the standard typically won’t cause problems, an excessively heavy door or one that pulls up forcefully requires adjustments.
Additionally, a broken spring can also result in excessive force errors. If a garage door spring is broken, the opener will detect the added weight and prevent the door from closing. Inspect your garage door springs for any signs of breakage and replace broken spring as needed.
6. Bad Travel Module
If your garage door opener is showing excessive force errors, it may indicate that the travel module is defective. To troubleshoot the module, remove the garage door opener cover and inspect the travel module’s wiring. Ensure the wires are intact and that the harness is properly connected. If the issue persists, replace the travel module.
Side-mounted garage door openers typically use the 041B8861 travel module with a wire harness, while most ceiling-mounted DC openers utilize the universal travel module 041D8071-4.
7. Bad Motherboard or Electric Motor
Excessive force errors may also indicate a defective opener motherboard or electric motor. Unfortunately, determining which component is causing the issue can be challenging. You might proceed with repairs and replace these parts, only to discover later that the problem remains unresolved.
Understanding Excessive Force Error
Excessive force errors often arise from sensitivity issues with your garage door. If the opener detects an obstruction or excessive pressure, it is designed to prevent the door from closing. Older garage door openers utilized a simple RPM sensor for this purpose, as mandated by UL 325 safety standards. However, advancements in technology have led LiftMaster and Chamberlain to replace the traditional RPM sensor with a modern travel module, offering greater control and potentially safer operation.
Know When to Contact a Garage Door Repair Pro
Fixing excessive force errors with your garage door is not always straight forward as you might think. Additionally, tampering with loaded springs and repairing garage door openers with electrical components without the proper tools and some knowledge can result in injuries and further damage to your overhead garage door. If you’re not sure how to proceed with repairs, contact a licensed garage door repair company in your area.


