If you’re not fully aware of what your garage door is capable of, these hacks will help you use it more efficiently and customize it to fit your needs.
1. Change the Time Your Opener Lights Stay On
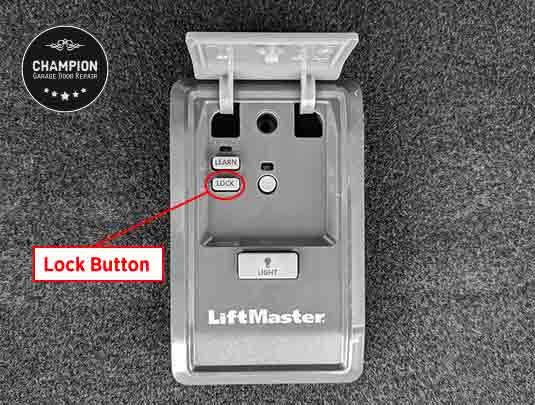
If your garage door opener lights stay on for too long or not long enough, you can adjust the timer. To do this, you’ll need a wall control with a lock feature and follow these steps:
Press and hold the lock button until the garage door opener light flashes. The number of flashes indicates the time the opener’s light will stay on:
- 1 flash = 1.5 minutes
- 2 flashes = 2.5 minutes
- 3 flashes = 3.5 minutes
- 4 flashes = 4.5 minutes
Repeat the process to toggle between time intervals. If you have a wall control with a screen, you can adjust the timer by going to Menu and Light Settings.
2. Keep Your Garage Door Opener Lights On
If you’re working inside the garage and need extra light, press the light button on your garage door wall control. This button functions like a regular light switch, keeping your garage door opener lights on until you press it again or until you open or close the garage door. If your wall control is shaped like a doorbell and doesn’t have a light switch, you can replace it with an upgraded model that includes a switch. Consult your door manufacturer or a licensed garage door repair company for compatibility.
3. Light Up Your Garage Automatically
Have your garage door lights turn on automatically whenever you walk into the garage, without needing to press the light switch. Some garage door wall controls are equipped with motion detectors that activate the light when they detect movement. If your garage door system doesn’t have this feature, you can upgrade your existing wall control. For LiftMaster or Chamberlain garage door openers with a red or purple button, you can upgrade to the 889LM wall console. For LiftMaster or Chamberlain openers with a yellow button, upgrade to the 880LM console.
4. Remove Access to a Remote Control Using Your Opener App
With a smart garage door opener, you no longer need to erase the memory to remove access to your remote controls. Simply follow these steps:
- Open the MyQ app.
- Go to Device Settings > Remotes.
- Tap and hold the remote you want to disable, then tap Delete.
It’s also helpful to name your remote controls so you can easily identify them. You can name remote devices by programming them through the app:
- Go to Device Settings > Remotes.
- Tap Program a Remote.
- Follow the on-screen instructions.
This feature allows you to remove access to individual remote controls anytime, from anywhere, and prevents the need to reprogram all your other garage door remote controls, keypad, and car if you perform a hard reset.
5. Vacation Mode to Prevent Access to Your Garage
The vacation mode feature on your garage door control panel is represented by a button with a lock image. This feature allows you to disable access to all of your remote devices, including remote controls, keypads, and cars.

To activate vacation mode press and hold the lock button until the wall control’s LED turns on or starts blinking.
To disable vacation mode press and hold the lock button again until the wall control’s LED turns off or becomes solid.
6. Fix Your Garage Door Easily
Garage door openers are equipped with a troubleshooting LED that can help diagnose issues if your garage door is malfunctioning. This LED is typically located on the motor head, usually on the side with the antenna. If your garage door isn’t functioning properly, check the error code displayed by the LED and refer to your owner’s manual for detailed instructions on how to repair the issue.
7. Maximize Your Garage Door Security
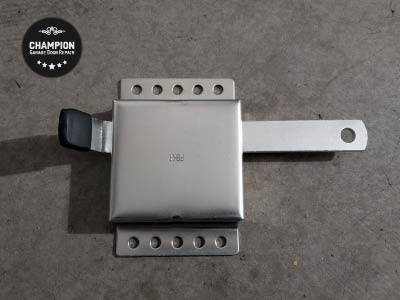
Improve your garage door security with a simple lock that significantly boosts protection. Once engaged, the lock will prevent anyone from force opening your garage door. You can use it when you’re away or simply for added peace of mind.

While this is a manual lock, some garage door openers can be equipped with an automatic lock that engages and disengages when you open or close the door.


